Updated: 2025-11-20
Over the years, I’ve shared dozens of dbt (data build tool) tips on LinkedIn that have helped teams cut Snowflake costs by 40%, slash build times in half, and catch data quality issues before they reach production.
These aren’t theoretical best practices. They’re battle-tested techniques from real projects where the wrong warehouse size meant burning $500/day, or a missing test caused executives to make decisions on stale data.
I’ve consolidated the most impactful tips into this single resource, organized by what matters most: getting started right, leveraging the ecosystem, optimizing costs, and mastering advanced techniques.
Essential dbt Tips and Tricks
🎯 Essential Foundations
Get started on the right foot
📦 Packages & Testing
Don’t reinvent the wheel
💰 Snowflake Cost Optimization
Stop burning money on compute
⚡ Performance & Advanced
Level up your dbt game
Note: Tips marked with ❄️ are specific to dbt + Snowflake. All tips below are expanded from my original LinkedIn series, now consolidated for easy reference.
Tip #1: Use dbt
 🔍Why manually create SQL views and procedures when dbt can do the heavy lifting of keeping your project organized, readable, and documented?There’s no reason to not use dbt for your existing SQL workflows!
Cost-Effective: dbt Core is free to use. dbt Cloud has a “Free Forever” tier so you can schedule your jobs and explore your project at no cost.
Simplify your workflow: Don’t combine tools! Using only dbt for transformations makes it clear how objects were created. Mixing tools can lead to confusion about what tool created which object.
Read on for more tips!
Tip #2: Use dbt as a Cloud Formation Template for Your Analytics Database
 Let dbt control your analytics database
Building on the previous tip about using #dbt for all transformations, today’s focus is on the power of dbt in managing your entire data warehouse setup and object creation.
✅ Do not run DDL outside of dbt ⚠️
Aside from loading data to the warehouse, let dbt handle everything else.
You should be able to execute dbt build in a new Snowflake account (or warehouse of your choice) and dbt handles all schema creation and permissions.
🔗 Manage Permissions Seamlessly: Utilize the grants configuration in dbt to streamline permission management.
https://docs.getdbt.com/reference/resource-configs/grants
🛠️ Extend dbt’s Capabilities:
1️⃣ Custom Materializations: Need a stored procedure? Craft a custom materialization in dbt. (But why, really, do you need a sproc? Comment below.)
2️⃣ Pre-hooks & Post-hooks: Use these for SQL code execution essential for checking the state or logging to other objects.
3️⃣ Speaking of logging, you can use dbt_artifacts package by Brooklyn Data Co. (a Velir company). This will be featured in a Tip of the Day coming soon. Example: on-run-end:
{{ dbt_artifacts.upload_results(results) }}- Source: https://hub.getdbt.com/brooklyn-data/dbt_artifacts/latest/
There’s only one exception to the rule. The original service account and database can be created manually, and you can save that in the analyses folder in dbt so it is version controlled. Or, there’s a package for that too 😉:
https://hub.getdbt.com/Divergent-Insights/snowflake_env_setup/latest/
But now I always use Titan: https://github.com/Titan-Systems/titan
Wow, was that just one tip?! LOL.
Tip #3: dbt Cloud is the easiest way to get started
#dbt Tip of the Day: dbt Cloud is the easiest way to get started with dbt
Starting with dbt can be daunting if you’re not familiar with Python, command line interfaces, or customizing an IDE with extensions. dbt Cloud removes these complexities, offering a more user-friendly experience.
🟢 Managed Environment: Forget about installing Python or understand pip and venv. Just start with SQL in a fully managed environment.
🟢 Built-in IDE: Comes with a formatter and linter. No more struggles with complex configurations!
🟢 Visual Workflow: Provides a clear, graphical view of your data models and pipelines, simplifying the understanding of dependencies and data flow.
🟢 Git with Guardrails: Git can be challenging for beginners. dbt Cloud simplifies this with an easier, more guided experience.
🟢 Version Flexibility: Switch between dbt versions effortlessly using a simple dropdown menu.
🟢 Team Collaboration: Benefit from fully managed access controls for easy and secure team collaboration.
🟢 Simple Scheduling: Need to schedule your pipeline? dbt Cloud streamlines this process, making it straightforward and efficient.
While there are many ways to orchestrate and tools I prefer over dbt Cloud, this tip is for beginners! The easiest way to start using dbt is likely through dbt Cloud.
https://www.getdbt.com/product/dbt-cloud
Tip #4: Understand virtual environments
Tip of the Day: Understand venv and requirements.txt if you run dbt Core
Installing dbt is straightforward with pip, as detailed in the dbt documentation:
https://docs.getdbt.com/docs/core/pip-install
If you’re new to Python, you may not understand what is happening with the venv steps.
Virtual environments are key in managing dependencies without conflicts between Python projects.
To better understand venv, I 💚Corey Schafer’s videos.
One for Windows and one for Mac
You will learn it is crucial to understand the requirements.txt file. This file lists all the Python packages your project needs.
Both videos above cover this, but I want to highlight its importance. A well-maintained requirements.txt ensures that anyone who works on your project can set up their environment with the right dependencies, making collaboration smoother.
🔒 I recommend using a separate virtual environment for each dbt (and Python) project. It’s a best practice that keeps your projects tidy and free from conflicts. In fact, I rarely use my primary Python installation because of this. 🔒
Tip #5: Know the dbt style guide
Getting acquainted with the dbt Style Guide can greatly improve the readability and consistency of your dbt projects. Check out the full guide here:
Here are some standout recommendations directly from the guide:
➕ Boolean Naming: Prefix Boolean columns with is_ or has_ for clear understanding.
🕰️ Timestamp Columns: Name timestamp columns as _at (like created_at) and always use UTC. (I think timestamp_tz, which is stored in UTC but displayed in local time, is also a nice choice.)
📆 Date Columns: Use _date for date columns to maintain clarity.
👻 Jinja Comments: Utilize Jinja comments for notes that shouldn’t appear in the compiled SQL.
🥸 Avoid table aliases in join conditions (especially initialisms) — it’s harder to understand what the table called “c” is as compared to “customers”.
➡️ Always move left to right to make joins easy to reason about - right joins often indicate that you should change which table you select from and which one you join to.
🔝 All ref(’…’) statements should be placed in CTEs at the top of the file.
🤏🏻 Limit the data scanned by CTEs as much as possible. Where possible, only select the columns you’re actually using and use where clauses to filter out unneeded data.
These tips help maintain a standard across dbt projects, making your work easier to understand and collaborate on.
It is not necessary to follow dbt’s style guide exactly, but it is important to have one!
Tip #6: Understand packages and know the dbt Package Hub
🔍 What are dbt Packages?: In its simplest form, a dbt package is the same as a dbt project. A package is a project that you import into your project.
We often think of dbt packages as reusable sets of models, macros, and tests that can be integrated into your dbt projects. They help you avoid reinventing the wheel for common data modeling patterns.
🌐 Discover the dbt Package Hub: The hub hosts a variety of packages created by the dbt community. You can explore and incorporate these into your projects to solve specific problems or add functionality. Check it out the package hub here.
Benefits of Using dbt Packages:
⏱️ Time-Saving: Pre-built packages can save you time otherwise spent on building logic from scratch.
✅ Best Practices: Leverage the collective wisdom and best practices embedded in community-developed packages.
🔧 Customization: Although these packages are pre-built, they offer enough flexibility to be tailored to your specific needs.
Below, I’ll be highlighting some of my favorite packages from the Package Hub
Tip #7: Get familiar with the dbt Utils package
dbt_utils is by far the most widely used dbt package. It is included in almost every project and package I’ve come across.
This package offers a collection of handy macros and utilities that can supercharge your dbt projects.
🌟 Why dbt_utils?
🟢 Efficiency: Streamline common SQL tasks with ready-to-use tests, macros, and SQL generators.
🟢 Consistency: Maintain standardized coding practices across your projects or database types.
🟢 Flexibility: Tackle a variety of data transformation challenges with ease.
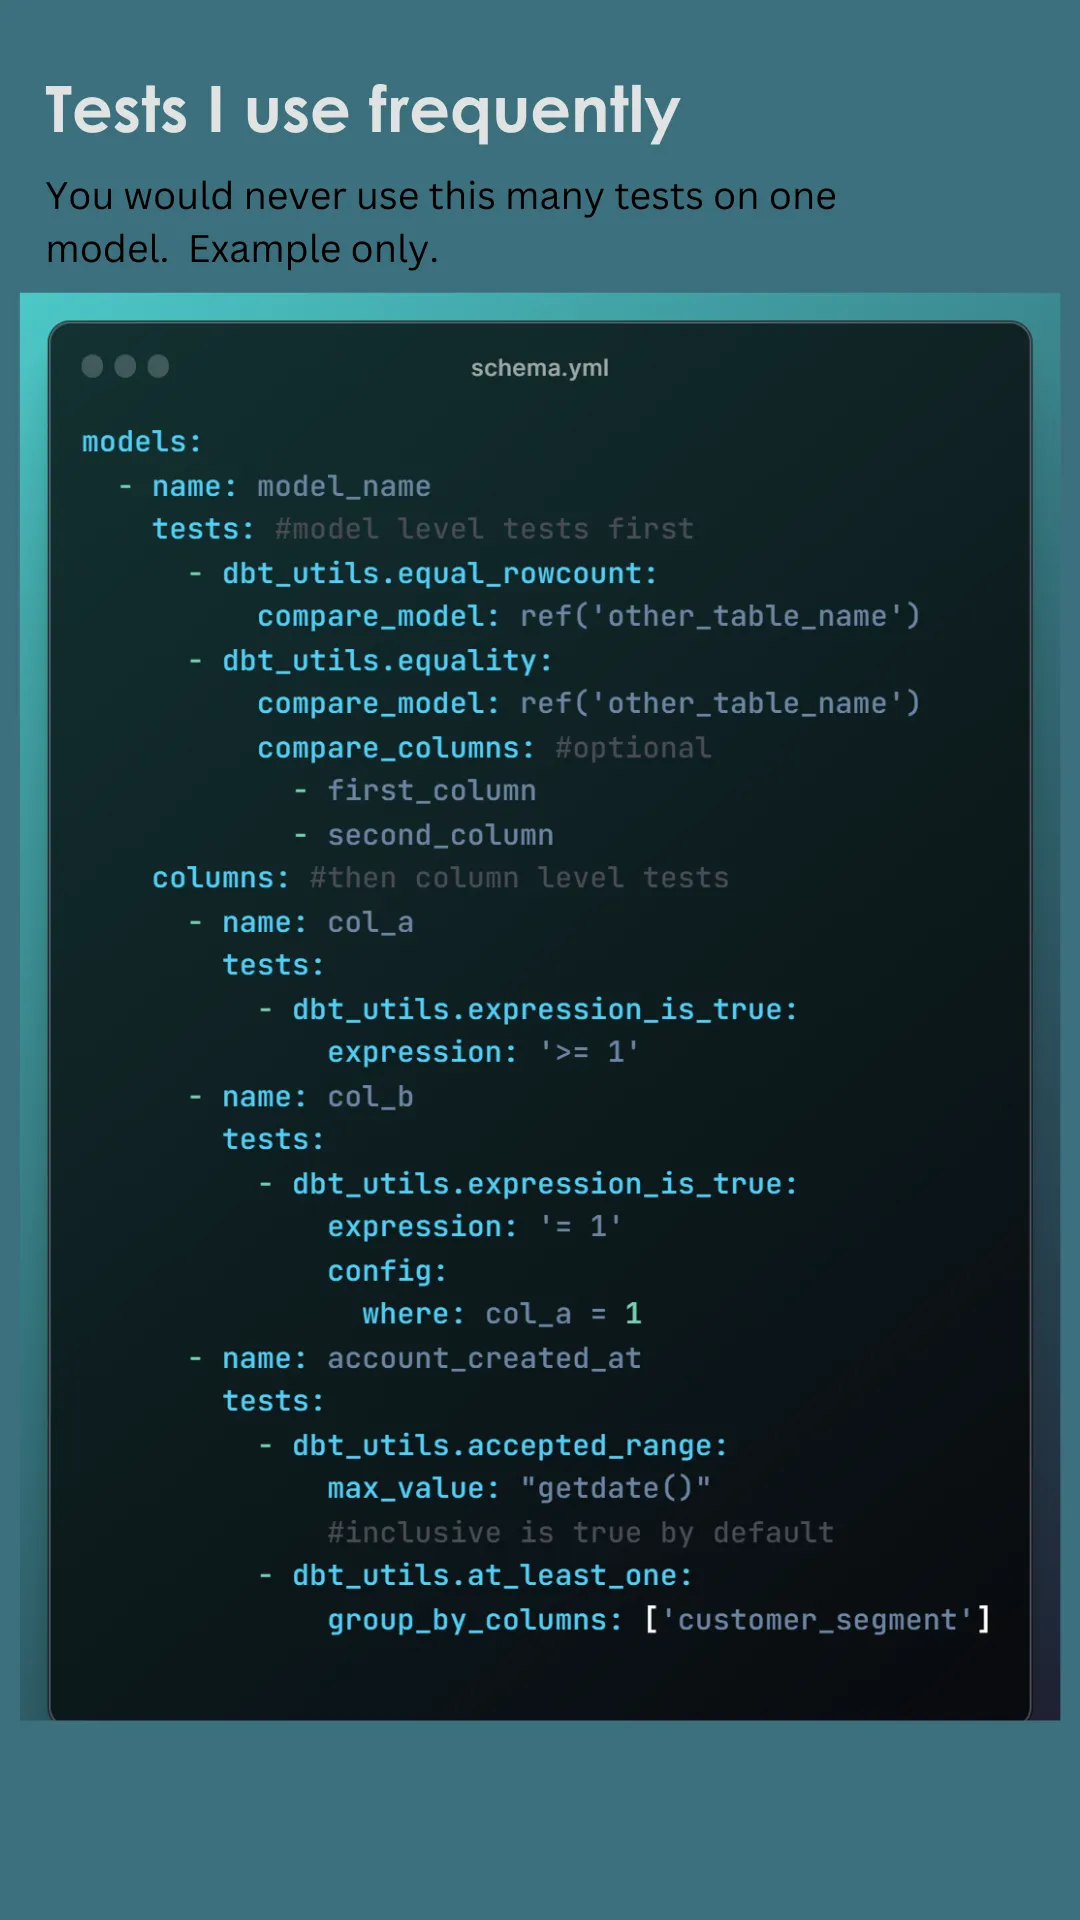
📈 I’ve compiled a presentation with some examples that I use in almost every project. Check it out to see how you can apply these tools in your own projects!
The package can be found here: https://hub.getdbt.com/dbt-labs/dbt_utils/latest/
Tip #8: use dbt_expectations
Don’t write a custom test before checking dbt_expectations Today, let’s explore the dbt_expectations package – a powerful extension for dbt, inspired by the Great Expectations package for Python.
This package allows dbt users to implement Great Expectations-like tests directly in their data warehouse, streamlining the testing process.
📊 What Can dbt_expectations Do? A real life experience:
Yesterday I opened a project that I haven’t worked on in a long time. I found that every custom test I wrote could have been covered out-of-the-box using dbt_expectations tests, saving time and reducing custom code.
Row count of new model should equal the filtered row count of a different model. There’s a test for that!
There should be at least 40K new subscribers (records) last month. There’s a test for that!
Max of column is between. There’s a test for that!
💥 We can’t even scratch the surface in a single post. 💥
Just take 1 minute to skim all of the tests available, and remember to check this package before writing a custom test!
If you’d like the assistance of an expert implementing dbt_expectations, please hit “Chat with us”!
https://github.com/calogica/dbt-expectations/tree/0.10.1/?tab=readme-ov-file#available-tests
❄️ Tip #9: Understand Cost per Model and Cost Per Project in Snowflake 💸
As we continue to explore the dbt Package Hub, let’s examine a package that helps with Snowflake cost attribution.
But first some background… In Snowflake, there are two reasonable ways to attribute spend to various cost centers (teams, departments, projects, dashboards, etc.): Query Tags and Query Comments. ⁉️
(Note, I did not say using different Virtual Warehouses per team is a good way to do this. If this makes you curious, please hit “Chat with us”!)
🏷️ Query Tags: Query tags are great for cost attribution, but they have a few limitations:
1️⃣ 2000 Characters
2️⃣ Requires “alter session” to tag multiple queries
3️⃣ Only applies to Snowflake
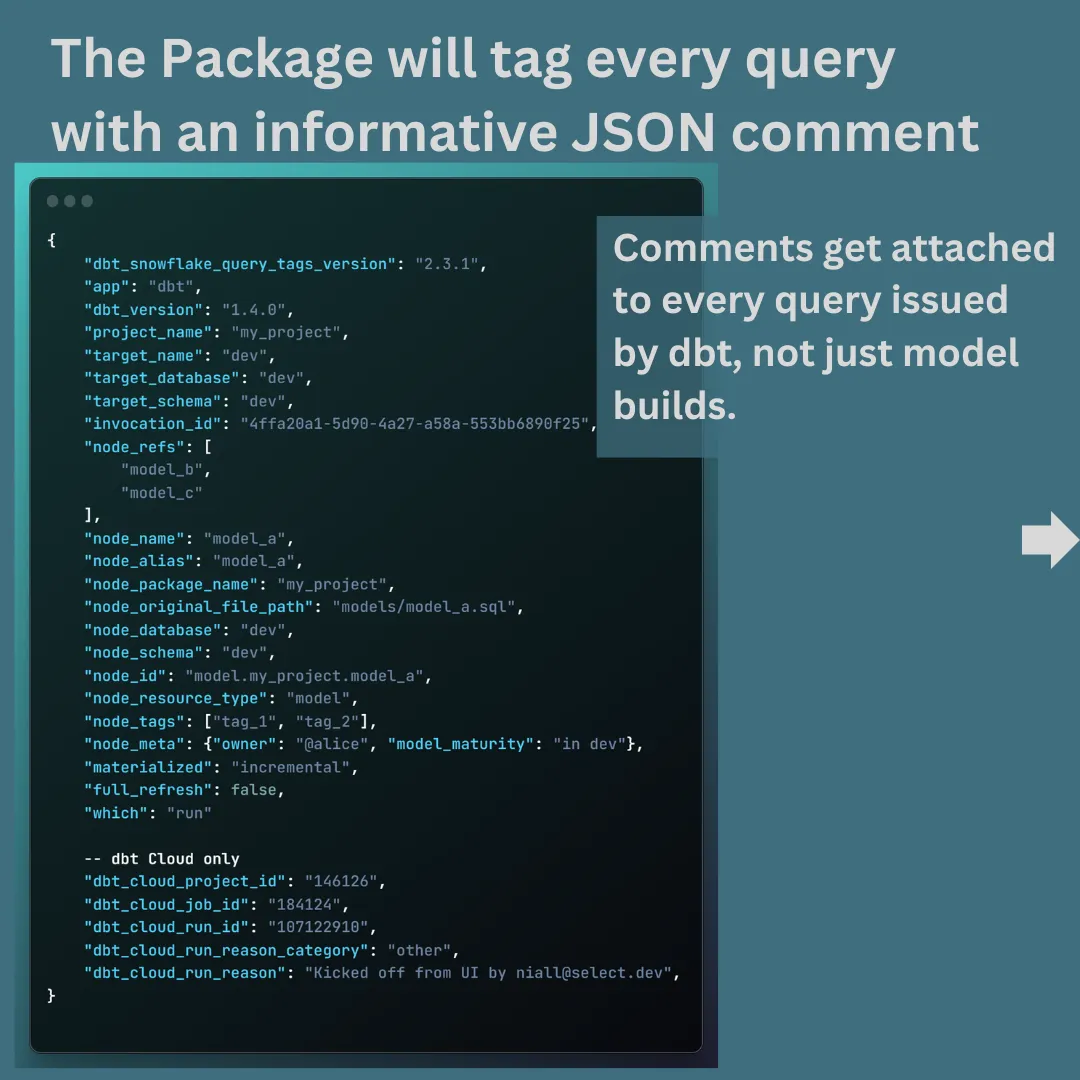
🗨️ Query Comments: You add a robust JSON comment to every SQL query.
This comment can be inspected by a cost attribution application or dashboard.
Enter dbt_snowflake_query_tags package by SELECT . SELECT uses query comments as the primary tagging method.
Check out the package here:
https://hub.getdbt.com/get-select/dbt_snowflake_query_tags/latest/
To dive deeper on query comments and tags, check out this blog post.
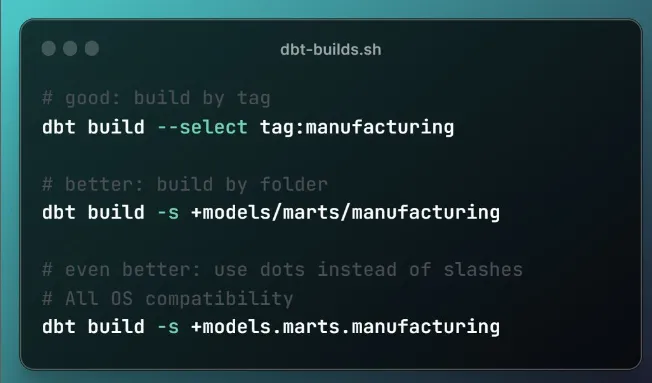
Tip #10: Build models by folder instead of tag
While tags are useful in dbt, relying on folder structure offers a more resilient way to select and build models.
✅ This method doesn’t depend on every upstream model being tagged correctly.
In the image below you’ll find two more tips:
1️⃣ Use -s instead of —select. Less typing.
2️⃣ Back slash for Windows, forward slash for mac / Linux / dbt Cloud can be confusing and have compatibility issues across users of the same repo.
❗Use dot notation when selecting by folder.
There is a typo in the image below. When using dot notation, don’t mention the models folder for some reason…
Tip #11: Use a single column in the check_cols Snapshot config. 🤔
I wanted to highlight another use case from #dbt_utils package that I use in almost every project.
When creating a Type II Slowly Changing Dimension using dbt Snapshot, you have two ways to tell dbt how to check for changes: timestamp or check (columns).
I have found that a reliable timestamp from the source system is less common in the wild than we’d like; very often we need to check a list of columns to see if anything has changed.
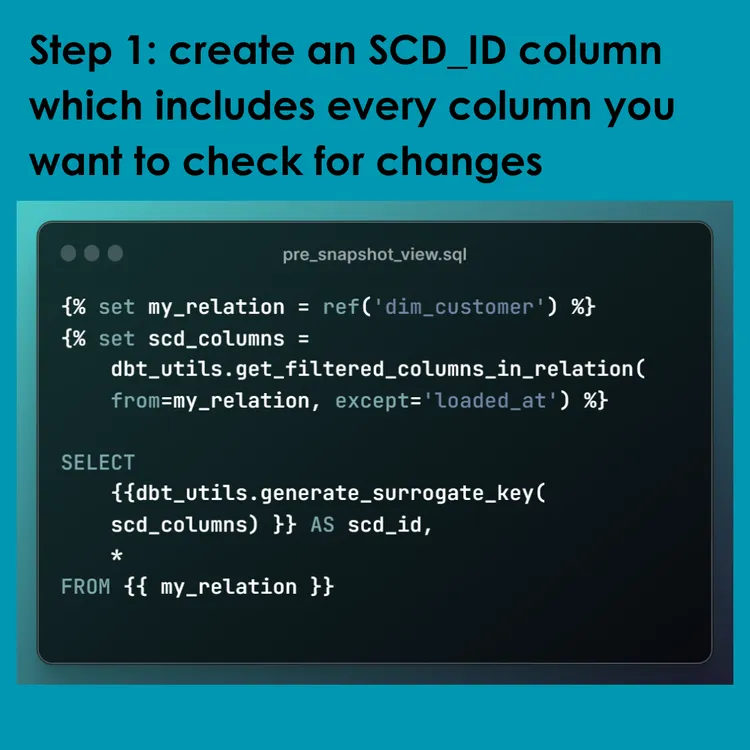
If you use “all” or some form of “all except” in the check_cols config, it will cause your SQL query to be PAINFULLY slow. Trust me. Luckily, there is a better way to check “all columns” for changes!
We can create an SCD_ID column before the snapshot. This column hashes all of the columns you need to check for changes. Very commonly this amounts to “check every column except for the loaded_at field.”
To achieve this, we can combine get_filtered_columns_in_relation with generate_surrogate_key to create the new SCD_ID field. Then pass the SCD_ID to the check_cols argument of the Snapshot config. Easy peasy!
I hope you were ready for an Advanced tip! Let me know if you have any questions!
Tip #12: You can use incremental models to snapshot your data 🤯
You are probably thinking, “That is what dbt snapshot is for!”
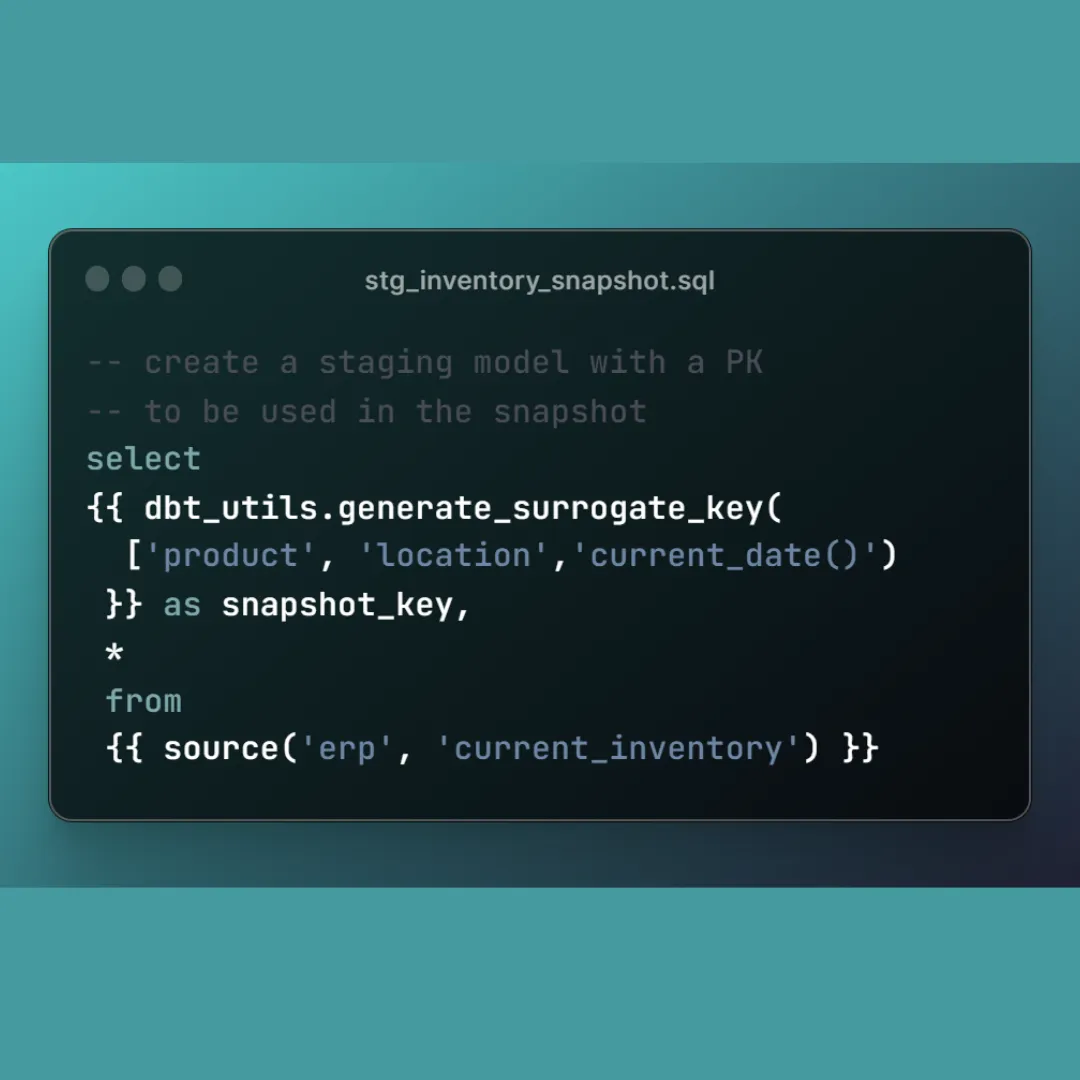
🤔 Consider this scenario: You need to trend inventory levels by product, location, and date.
📉 A dbt snapshot is a poor choice, because only the changed records will create a new row each day. You won’t be able to create a trend chart in your BI tool unless you have one row per product, location, and date.
📈 In this case, you want to snapshot the ENTIRE source, once per day, while adding a field called snapshot_date. You can do this using an incremental model. See below how it is done. Let me know your thoughts!
❄️ Tip #13: Set warehouse size per model
Make your #dbt + Snowflake models build faster while minimizing costs!
❄️ One of the key aspects of working efficiently with Snowflake in dbt is managing virtual warehouses. Did you know you can override the default warehouse setting for specific models or groups of models?
🏗️ Why Manage Warehouses at the Model Level?
1️⃣ Cost Control: Different models have different processing needs. By assigning appropriate warehouses to specific models, you can control your Snowflake costs more effectively.
2️⃣ Optimized Build Times: Use larger warehouses for heavier models to speed up build times without incurring unnecessary costs on lighter models.
👍 Outcome: With this approach, you ensure that each model runs on the most cost-effective and efficient warehouse, balancing resource use and performance. A little configuration goes a long way in optimizing your Snowflake costs and dbt project build times!
Typically you want the default size to be XS, then have specific models run a larger size.
See below step by step guide on optimizing your compute resources!

❄️ Tip #14: Power-Up Your Snowflake Warehouse Dynamically!
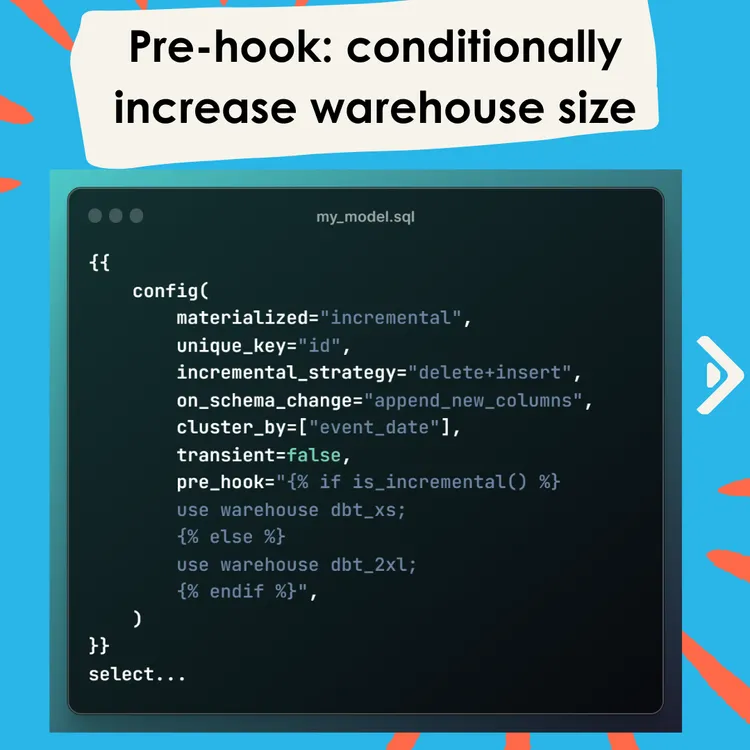
Managing resource allocation efficiently in Snowflake can be a game-changer, especially when dealing with varying data loads. A great dbt feature to achieve this is using conditional pre-hooks to dynamically select the warehouse size based on the nature of the job.
🔄 What’s the Strategy?
Use a pre_hook in dbt to conditionally select a warehouse.
For full refreshes or larger jobs, switch to a larger warehouse.
🔧 How to Implement: In your dbt model, you can use Jinja templating within a pre_hook to dynamically select the appropriate Snowflake warehouse.
📃 See document below with examples. 📃
🎯 By tailoring the warehouse size to the specific needs of each dbt job, you optimize both performance and cost – a smart move for any data engineer working with Snowflake and dbt!
❄️ Tip #15: Use Transient Tables for table models
Why keep old copies of the data produced by dbt Table models?
If the data set can be rebuilt from source, what’s the point of having Time Travel on it?
Enhance efficiency in dbt + Snowflake with these key strategies:
1️⃣ Embrace Transient Tables: Ideal for ‘table’ models where time travel isn’t crucial. They save costs and simplify processes.
2️⃣ Optimize Time Travel: Use maximum days for Snapshots, medium time travel for Incremental models. Set it at the schema level for streamlined management.
Another key point: When a table is replaced in Snowflake, it messes with the time travel. You have to rename then undrop a table to use the time travel. So for table models, there is very little point in keeping the retention history!
Adopting these practices can lead to more effective and cost-efficient data management in your dbt projects.
❄️ Tip #16: Optimize Snowflake tables with Clustering
Let’s focus on a neat feature in dbt for Snowflake users: Table Clustering.
Leveraging cluster_by in your dbt models can significantly optimize query performance and minimize workload on Snowflake’s automatic clustering.
🚀 What does cluster_by do?
1️⃣ Implicit Ordering: dbt automatically orders your table results by the fields specified in cluster_by.
2️⃣ Add Clustering Keys: It also adds these fields as clustering keys to your target table.
🔍 The Benefits:
1️⃣ Querying the table will be much faster, as Snowflake will be able to leverage Query Pruning.
2️⃣ By ordering the table with cluster_by fields, dbt reduces the effort required by Snowflake to keep the table clustered.
3️⃣ For incremental models, dbt also orders the staged dataset before merging, keeping your table in a mostly clustered state.
Tip #17: Use more targeted “import CTEs”
Speed up your queries with more targeted “Import CTEs”!
Let’s talk about a crucial aspect of query optimization in dbt: refining the use of import Common Table Expressions (CTEs).
While dbt’s earlier guidance suggested using import CTEs broadly, like with customers as (select * from customers), recent shifts in best practices point towards a more efficient approach.
New Approach: Limiting what you bring into import CTEs, focusing on necessary columns and applying filters right away.
📊 Why This Matters: Optimized Performance: By selecting only necessary columns, you reduce the data load, leading to faster query execution. Resource Efficiency: Filtering data at the import stage itself minimizes the processing required in subsequent steps.
🛠️ Example Shift in Approach:
Before: with customers as (select * from customers)
After: with customers as (select id, name, region from customers where region = ‘East’)
This approach not only aligns with dbt’s updated guidance but is also supported by various discussions and articles in the data community. See links below.
🌟 Takeaway: Refining your import CTEs can significantly enhance the efficiency and performance of your dbt models. Check out my attached slide for a clear “before and after” example of how to implement this in your dbt projects.
⚠️ Caveat: While optimizing import CTEs might not always impact performance, it’s a good habit to adopt. Often, CTEs act as simple passthroughs without affecting performance, but in some cases, these refinements can make a noticeable difference.
All-encompassing article on CTE considerations: https://select.dev/posts/snowflake-ctes
When CTEs hurt performance: https://medium.com/@AtheonAnalytics/snowflake-query-optimiser-unoptimised-cf0223bdd136
Tip #18: Streamline dbt + Snowflake with Dynamic Tables ❄️
How Snowflake’s Dynamic Tables Can Simplify Your Daily Runs! A dynamic table in Snowflake is similar to a Materialized View in other platforms, overcoming limitations of Snowflake’s Materialized Views.
🌐 Dynamic Tables: Must Know Features
Dynamic Tables can contain complex joins
Dynamic Tables can contain complex joins
Smart refreshes: Choose time-based updates (e.g., every ‘30 minutes’) or automatically refresh when required by downstream objects.
Custom Configuration: Tailor settings with on_configuration_change, target_lag, and specifying a snowflake_warehouse. You are refreshing often, so choose the right warehouse size for the job! (See more config in image below.)
💡 Key Advantages:
In simple scenarios, you may be able to eliminate scheduled jobs all together.
Efficiency: Optimize performance with targeted refresh strategies.
⚠️ Mind the Limitations:
Dynamic table SQL can’t be updated without a full refresh.
They can’t be downstream from certain objects like materialized views.
Switching to/from dynamic_table materialization? Drop the existing model manually before rerunning.
Dynamic tables in Snowflake and dbt offer a powerful mix of performance and adaptability, perfect for data engineers looking to push the boundaries!
Wrap up
The above covers several of my favorite tips from the bottomless bag of dbt tips. If you need help configuring your dbt project or Snowflake environment, I’d love to hear from you. Hit “Chat with us” in the bottom right of this page!

About the Author
Jeff is a Data and Analytics Consultant with nearly 20 years experience in automating insights and using data to control business processes. From a technology standpoint, he specializes in Snowflake + dbt + Tableau. From a business topic standpoint, he has experience in Public Utility, Clinical Trials, Publishing, CPG, and Manufacturing. Jeff has unique industry experience in Supply Chain Planning, Demand Planning, S&OP. Hit the chat button to start a conversation!

